SD-Access with Extended Nodes
Table of Contents
Unfortunately not all Cisco platforms support SDA. Cisco has chosen these platforms to be extended by SDA to be able to offer both a desktop platform and IoT platforms:
- 3560CX
- IE 3300
- IE 3400
- IE 3400H
- IE 4000 series
- IE 5000 series
- Catalyst Digital Building
NOTE! If you plan on using policy, meaning micro segmentation using SGTs, only IE 3400 and IE 3400H are supported as policy extended nodes!
Extended nodes must be connected to a single (or stacked) edge switch (excluding Catalyst 9200).
This post looks into how to get a 3560CX switch up and running as an extended node. Minimum supported software version for this platform is 15.2(7)E. The reason for this is that DNAC configures VLANs in the extended vlan range which cannot be configured in the default vtp server mode. The bug ID CSCvo60621 explains this behavior. With the fixed software the switch will detect the pnp startup-vlan and configure itself for vtp mode transparent and be able to create the VLAN and SVI to obtain an IP address and get onboarded.
Official Documents and References
Here is a list of the official documents that I’ve read prior to experimenting with extended nodes:
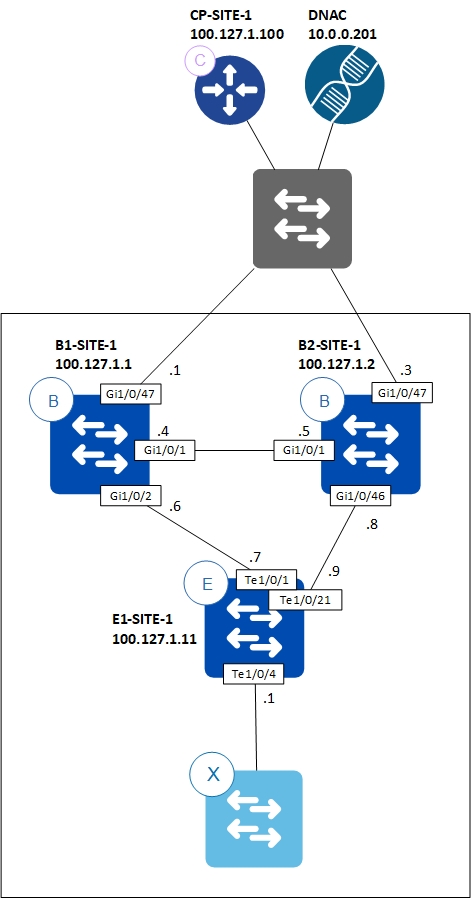
Topology
Configuration Steps
Since onboarding an extended nodes is done using Cisco PnP, it is required to configure a DHCP pool either on the edge node or a DHCP server using Option 43. This is no different than how you onboard APs by specifying the WLC in Option 43, except here we specify DNAC as the PnP server. Like APs, extended nodes reside in the INFRA_VN which maps to the global routing table. Cisco chose this to make it easier to establish connectivity between APs and WLC and extended nodes and DNAC as both WLC and DNAC usually reside in the global routing table. Therefore, configure an IP pool for the extended nodes for use in the INFRA_VN network:
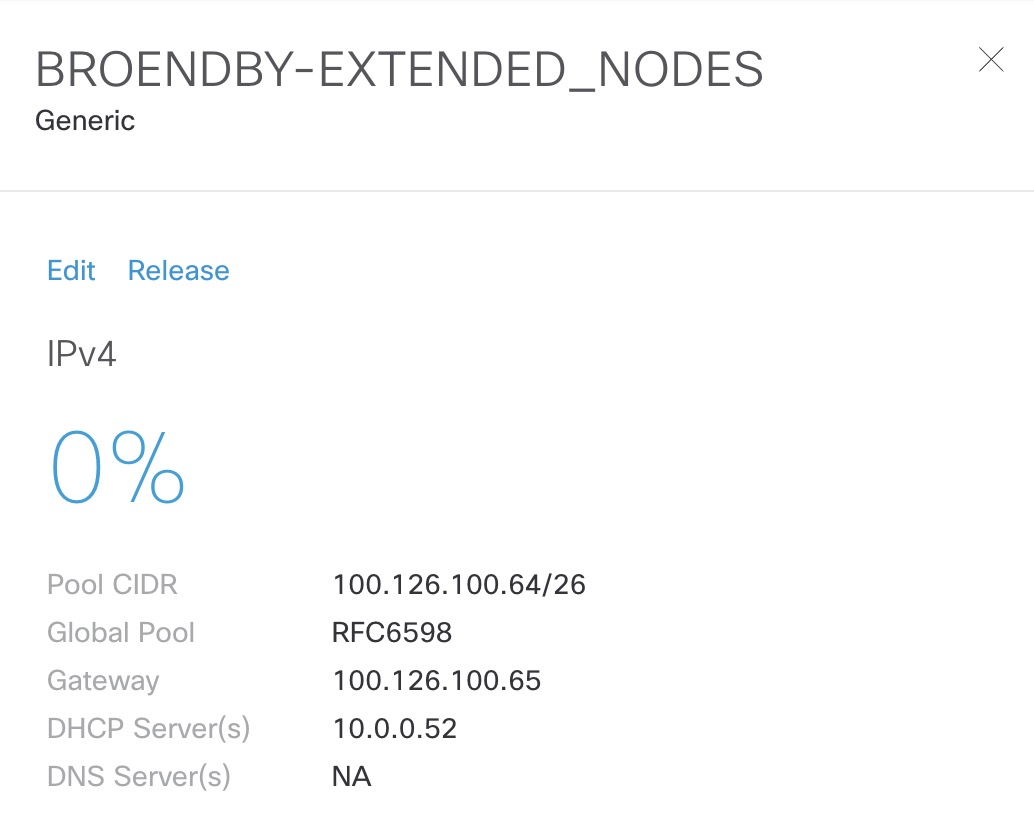
As you can see if have a global IP Pool with the name RFC6598 and made a reservation under the site for 100.126.100.64/26. This pool has been configured as a DHCP scope on a Microsoft DHCP server:
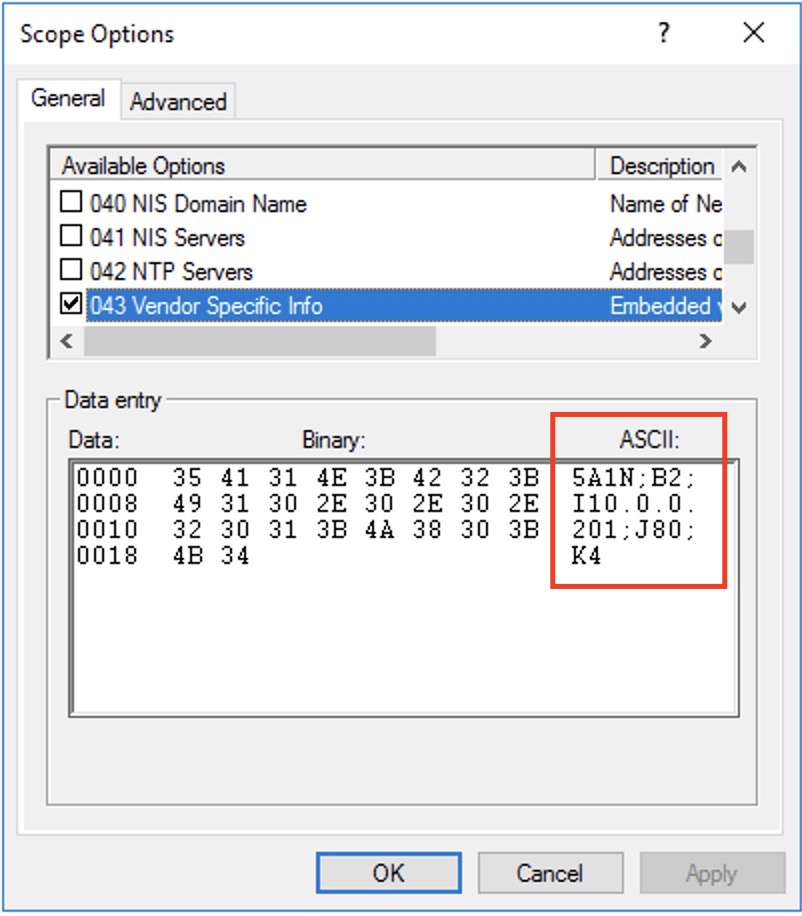
Notice the ASCII string for the option 43:
5A1N;B2;I10.0.0.201;J80;K4
You can read more about this in a previous post about PnP here
NOTE! If you’re using a Microsoft DHCP server, ensure that it does not strip Option 82 as this is required for the border node to be able to deliver the DHCP reply to the correct edge node. Windows Server 2012 R2 and later should transparently relay this option.
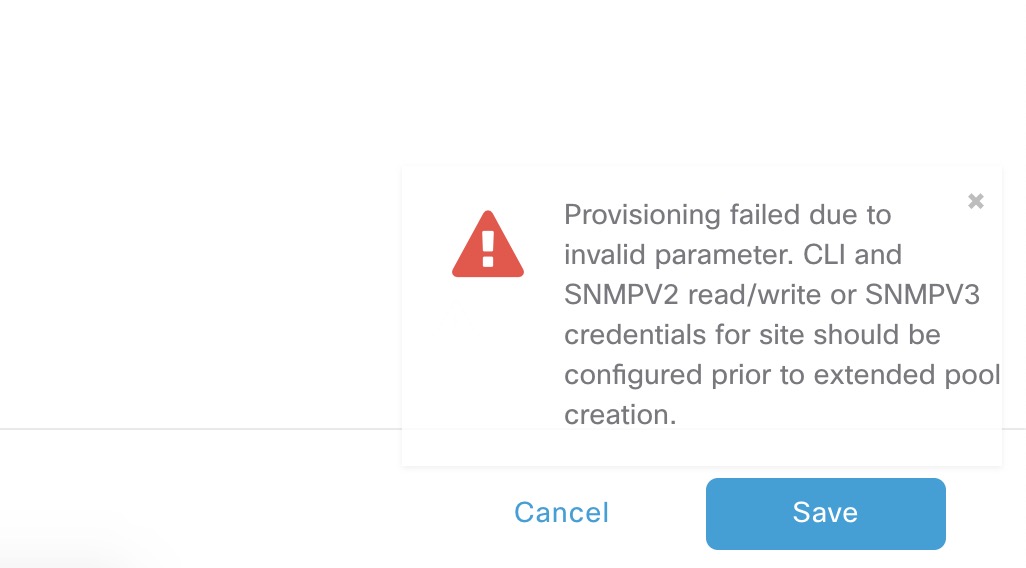
If not already configured, you must make sure to have either SNMPv2c write or SNMPv3 configured for your site. Extended nodes require SNMP write access. If this isn’t configured, you’ll get this error when adding the IP pool to the INFRA_VN under the fabric:
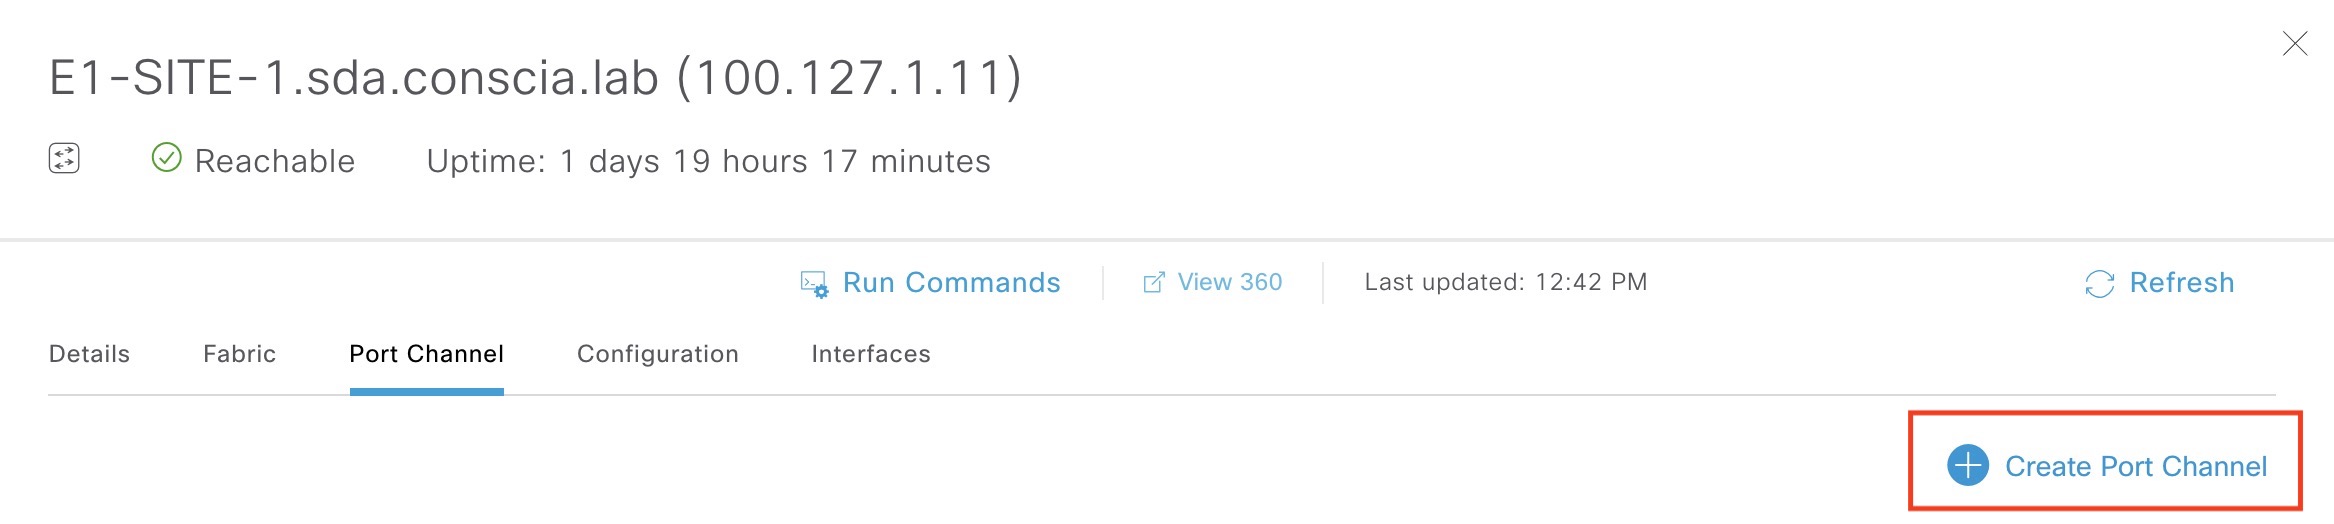
It is time to configure the edge node. You must configure a port channel using PAgP on the port(s) the extended node connects. This is done under the fabric. Click on the edge node and create a port channel:
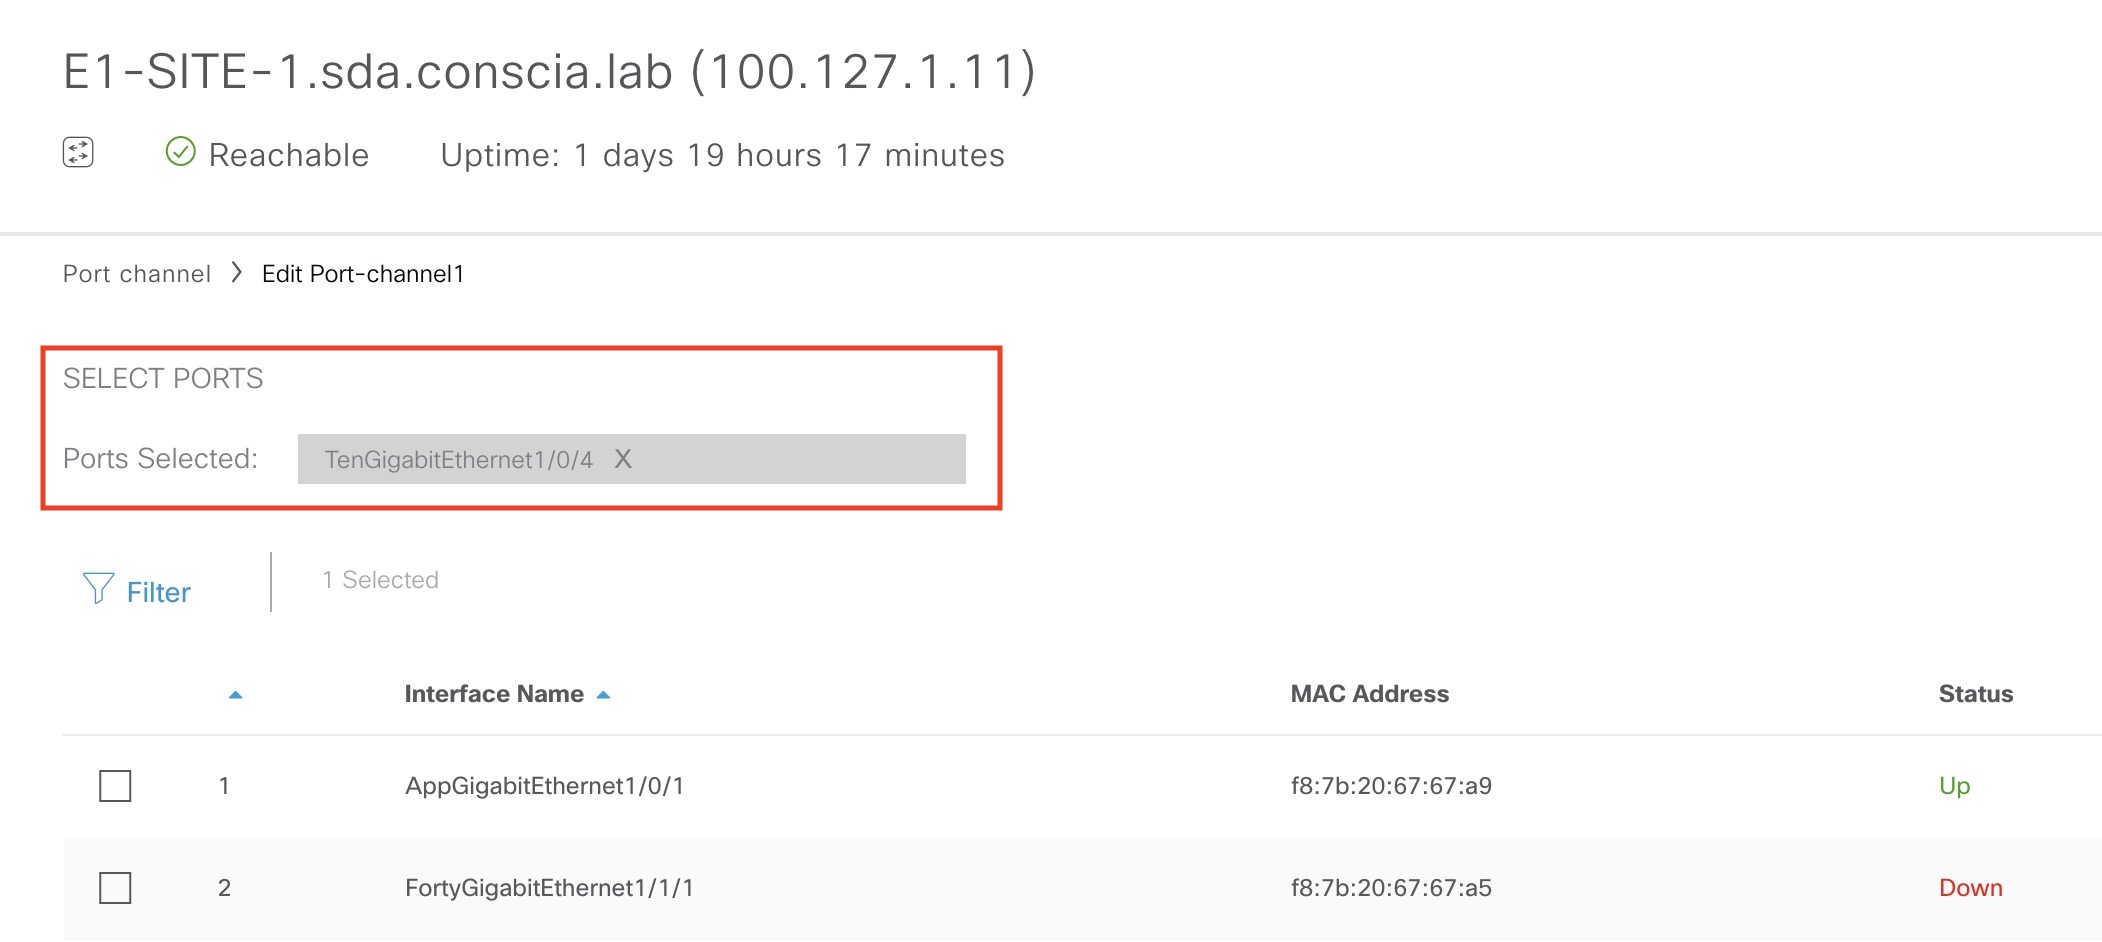
Select the interface(s) connecting to the extended node. In my case I’ve selected Te1/0/4:
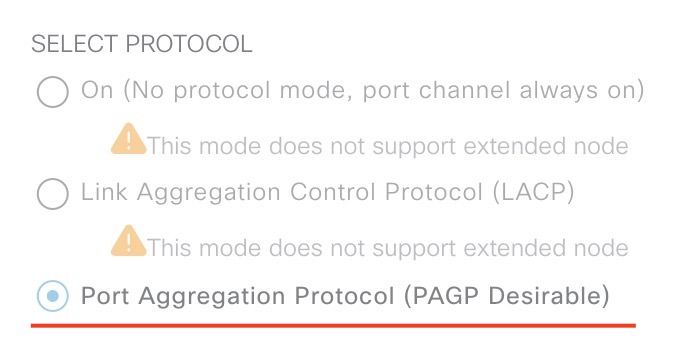
At the very bottom of this page, ensure to select PAgP as this is the only mode that supports extended nodes:
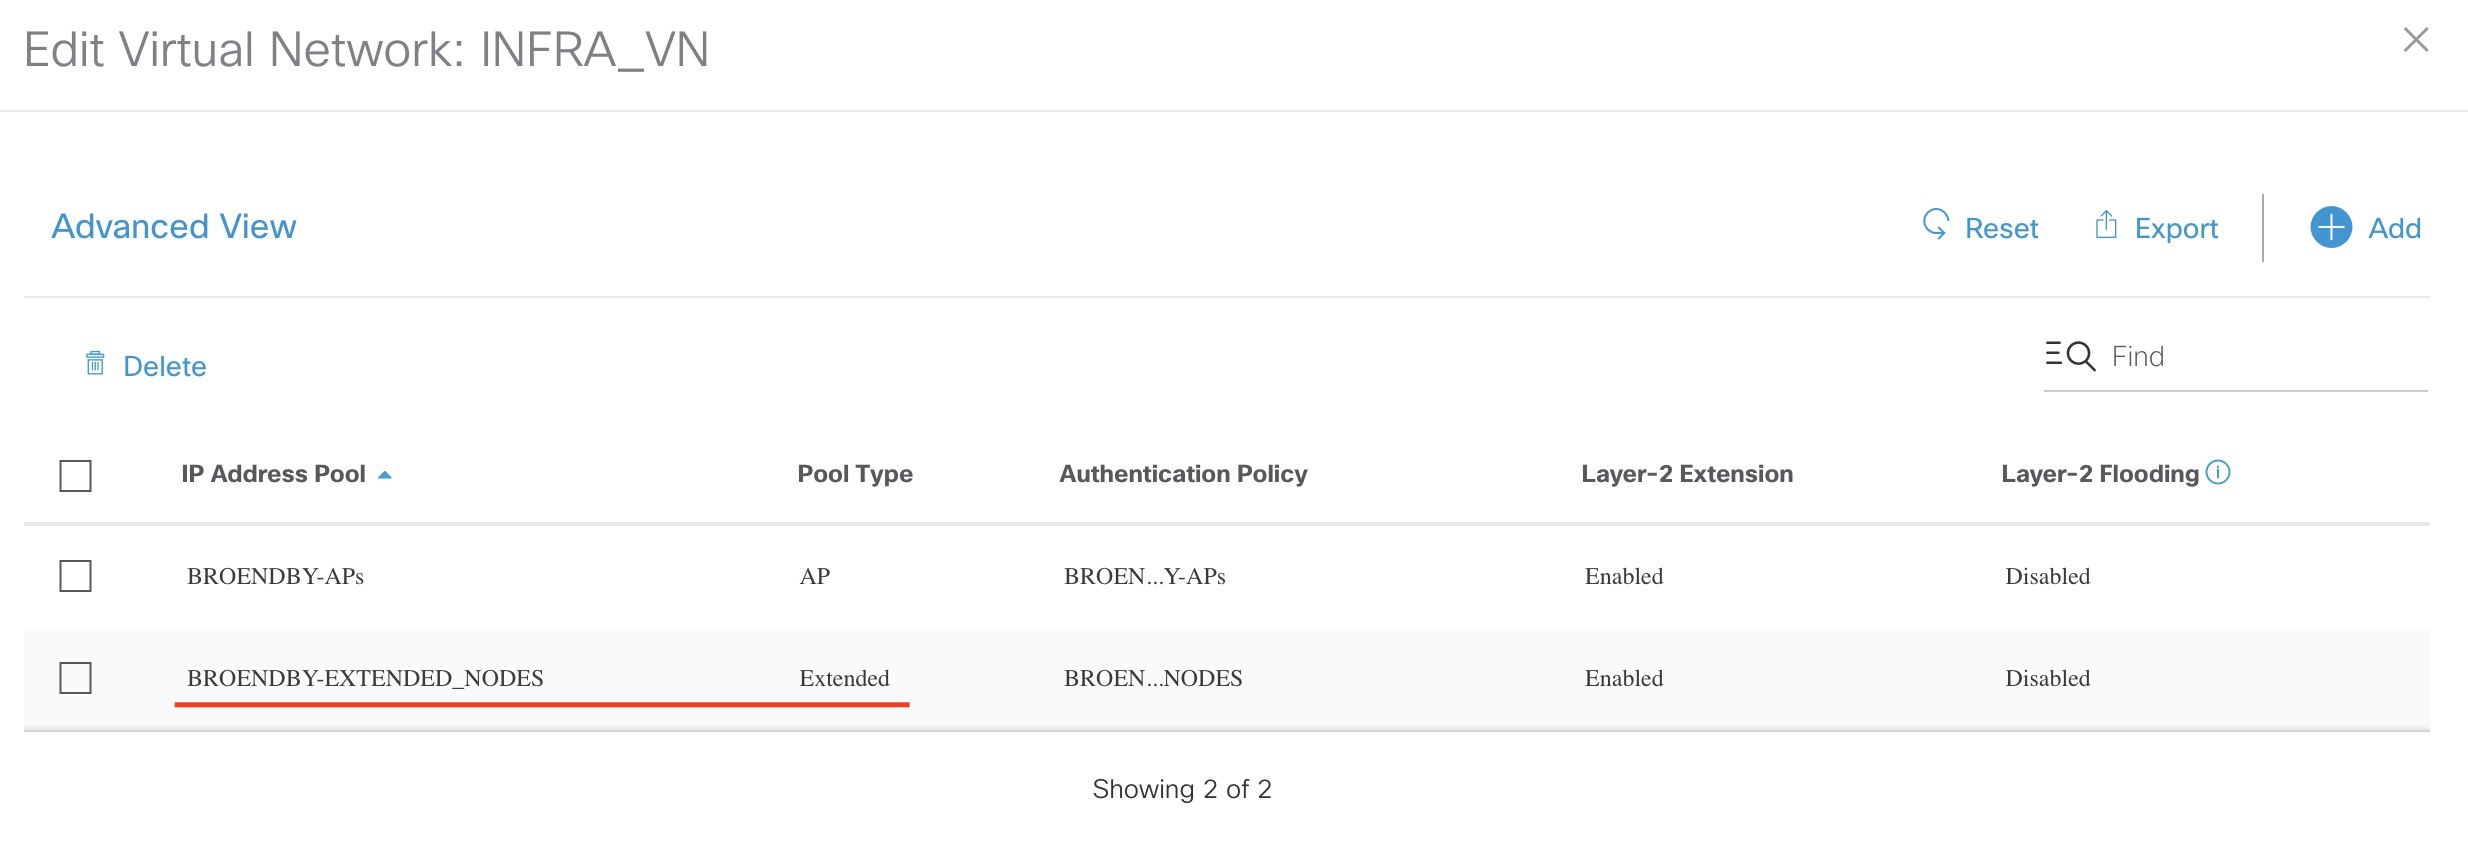
Add the IP pool under the fabric for INFRA_VN:
Since we’re using non-Native VLAN (Vlan1) for PnP, we must configure this to be signaled to the extended node on the edge node. This can be done by hand or via a template. The important thing is that we specify the VLAN created by DNAC upon adding the IP pool to INFRA_VN. In my case this is VLAN 1022:
pnp startup-vlan 1022
Ensure the new extended node is “clean”, meaning factory reset like it came out of box. If you’re unsure how to do this, check out my PnP post
Connect and power up the new extended node! Once it gets an IP address and connects to DNAC for PnP, it will automatically be provisioned with a configuration similar to this:
archive
 log config
  logging enable
  logging size 500
  hidekeys
  !
 !
!
service timestamps debug datetime msec
!
service timestamps log datetime msec
!
service password-encryption
!
service sequence-numbers
!
! Setup NTP Server
! Setup Timezone & Daylight Savings
!
! ntp update-calendar
!
! clock timezone <timezoneName> <timezoneOffsetHours> <timezoneOffsetMinutes>
! clock summer-time <timezoneName> recurring
!
! Disable external HTTP(S) access
! Disable external Telnet access
! Enable external SSHv2 access
!
no ip http server
!
no ip http secure-server
!
crypto key generate rsa label dnac-sda modulus 1024
ip ssh version 2
!
ip scp server enable
!
line vty 0 15
 ! maybe redundant
 login local
 transport input ssh
 ! maybe redundant
 transport preferred none

! Set VTP mode to transparent (no auto VLAN propagation)
! Set STP mode to Rapid PVST+ (prefer for non-Fabric compatibility)
! Enable extended STP system ID
! Set Fabric Node to be STP Root for all local VLANs
! Enable STP Root Guard to prevent non-Fabric nodes from becoming Root
! Confirm whether vtp mode transparent below is needed
vtp mode transparent
!
spanning-tree mode rapid-pvst
!
spanning-tree extend system-id
! spanning-tree bridge priority 0
! spanning-tree rootguard
! spanning-tree portfast bpduguard default
no udld enable
!
errdisable recovery cause all
!
errdisable recovery interval 300
!

! Enable SNMP and RW access based on ACL
!
snmp-server community dnac RO
!
snmp-server community dnac_rw RW
!

!
username dnac privilege 15 secret 0 <secret>
!
enable secret 0 <secret>
!

!
hostname SN-FOC1949W2K4
!

!This config goes to subtended node
ip igmp snooping
ipv6 mld snooping
    interface gigabitethernet1/0/4
      switchport mode trunk
      switchport trunk allowed vlan all
    !
!
  vlan 1022
  name BROENDBY-EXTENDED_NODES
!
ip default-gateway 100.126.100.65
!
!
end
As you can see this information comes from the Design section of DNAC. If you disagree with the configuration DNAC provides, you can create your own DayN template and provision once the extended node has been onboarded by DNAC. In particular, it might make sense to at least change the hostname.
Now you should be ready to use the extended node for you clients. You can even statically assign ports of the extended node:
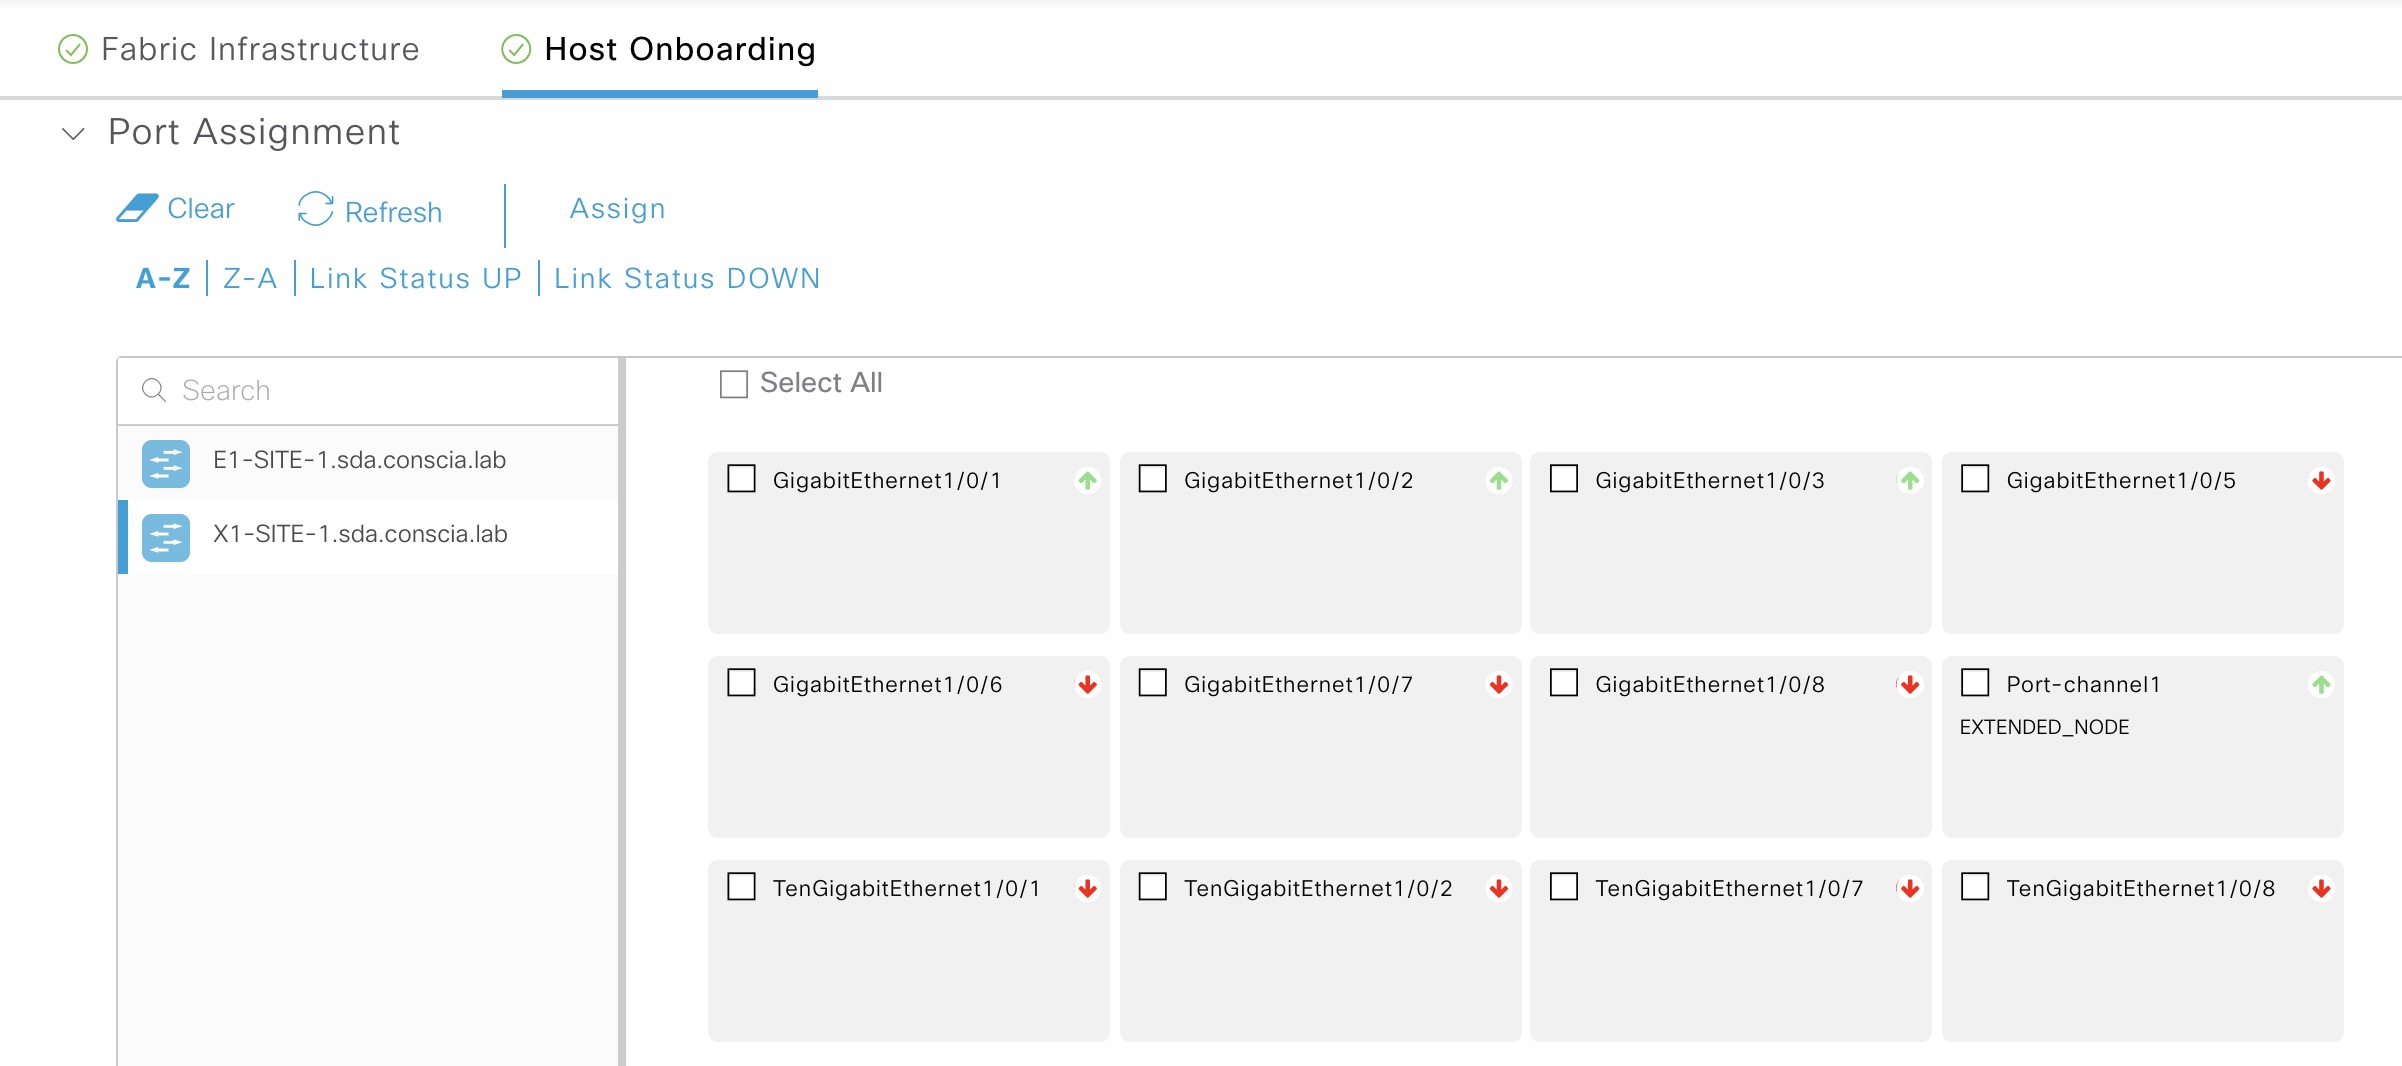
Why it allows you to configure the port channel, I do not know! In my experience all non-L3 ports show up here.
Conclusion
In the blog post necessary steps and requirements of implementing an extended node in SDA was revealed. The following steps are mandatory:
- Configure an IP pool for Extended Nodes
- Create a DHCP scope with Option 43 pointing to DNAC
- Configure SNMPv2c write or SNMPv3
- Create a port channel on the edge node using PAgP
- Add the IP pool to the INFRA_VN under the fabric
- Configure the pnp startup-vlan on the edge node
- Connect and power up a factory reset 3560CX
- Optionally configure DayN template for change the configuration of the extended node
I hope you found this post useful and enjoyed reading it. Please feel free to reach out if you have any comments or criticism.