DNAC Stuff
Table of Contents
Download ISO
Mirror
Alternatively you can download the 1.2.10 ISO at ftp://home.zartmann.dk/DNAC-SW-1.2.10.iso
Supported Devices List
DNAC 1.2 Supported Devices List
DNAC 1.3 Supported Devices List
Cisco Docs
SDA Design Guide
SDA Deployment Guide
SDA Wireless Design and Configuration Guide
SD-Access 1.2.x Hardware and Software Compatibility Matrix
Password Recovery
Below can be used to do a password recovery on DNAC.
For CLI maglev  recovery, you can use a normal Linux password recovery process
such as here:
https://askubuntu.com/questions/24006/how-do-i-reset-a-lost-administrative-password
Once you get access(after passwd recovery and boot back into DNAC), try
resetting "admin" UI user password with this:
$ magctl user password update admin TNT0
Inventory
$ cat /sys/devices/virtual/dmi/id/product_name
DN1-HW-APL

$ sudo cat /sys/devices/virtual/dmi/id/chassis_serial
[sudo] password for maglev:
FCH2131V1ZJ
Docker
You can remove docker containers that have a status of “exited”.
docker ps -f status=exited
docker rm -v $(docker ps -q -f status=exited)
sudo systemctl restart docker
Proxy
cat /etc/systemd/system/docker.service.d/https-proxy.conf
curl -x http://proxy-host:8080 --proxy-user proxy-user:proxy-password -L -k https://cdn.ciscoconnectdna.com
Update Config
$ sudo maglev-config update
Redundancy
Say we have uplinks failing in the following SDA topology:
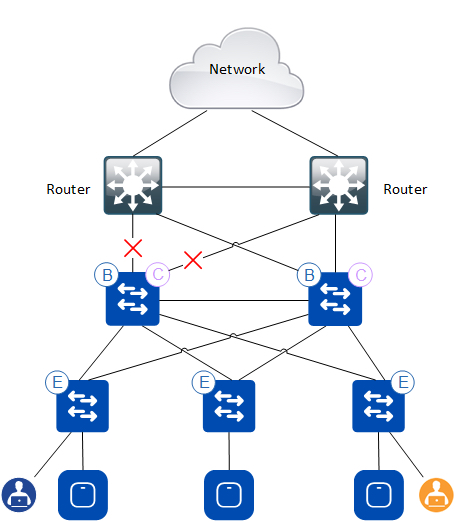
DNAC provisions:
- Uplinks as trunk interfaces
- SVIs for eBGP peerings
Since DNAC DOES NOT configure a trunk allow list on the uplinks, the SVIs are artificially held up/up and traffic is blackholed, as we attract traffic due to Loopback0 of the border still being reachable in the underlay.
The solution is to add enhanced object tracking of the uplinks and use them in an EEM applet for the cause of shutting down Loopback0 when we loose connectivity out of the border. An example of this could be:
track 19 interface FortyGigabitEthernet1/0/19 line-protocol
track 20 interface FortyGigabitEthernet1/0/20 line-protocol
track 21 interface FortyGigabitEthernet1/0/21 ip routing
!
track 1 list boolean or
 object 19
 object 20
 object 21
!
track 2 list boolean or
 object 19
 object 20
 object 21
 delay up 120
!
event manager applet UPLINKS_DOWN authorization bypass trap
 event syslog pattern "TRACK-6-STATE: 1 list boolean or Up -> Down"
 action 1.0 cli command "en"
 action 2.0 cli command "conf t"
 action 3.0 cli command "inter lo0"
 action 4.0 cli command "shut"
 action 5.0 cli command "end"
 action 6.0 syslog msg LISP_RLOC_SHUTDOWN_COMPLETE
!
event manager applet UPLINKS_UP authorization bypass trap
 event syslog pattern "TRACK-6-STATE: 2 list boolean or Down -> Up"
 action 1.0 cli command "en"
 action 2.0 cli command "conf t"
 action 3.0 cli command "inter lo0"
 action 4.0 cli command "no shut"
 action 5.0 cli command "end"
 action 6.0 syslog msg LISP_RLOC_NO_SHUTDOWN_COMPLETE
A boolean or in the track list above works by keeping the list up when at least one of the tracked objects are up, meaning that all uplinks must go down for list 1 to go down and we initiate a shutdown of the Loopback0 interface. Likewise just one of the uplinks has to come back up for list 2 to be up and we’ll initiate a no shutdown of Loopback0.
If you for some reason have a default route in GRT (Global Routing Table), LISP in Edge nodes will actually use this and keep sending traffic towards the border that is unable to forward the traffic. To mitigate this and change the behavior of LISP, we can tell it to exclude the default route lookups on the RLOC address, like this:
router lisp
 ipv4 locator reachability exclude-default
Alternatively there is a hidden command that ensure only /32s can be used:
router lisp
 ipv4 locator reach minimum-mask-length 32
Note these two commands are mutual exclusive which makes sense.
If you reload a border node and the IGP comes up before BGP does, you’ll also end up blackholing traffic. To mitigate this, we need more EEM!
track 3 ip route 10.0.10.0 255.255.255.0 reachability
!
event manager applet POST_RELOAD_SHUT_LO0 authorization bypass
 event syslog pattern "SYS-5-RESTART"
 action 1.0 cli command "en"
 action 2.0 cli command "conf t"
 action 3.0 cli command "inter lo0"
 action 4.0 cli command "shut"
 action 5.0 cli command "end"
 action 6.0 syslog priority critical msg "POST_RELOAD_LISP_RLOC_SHUTDOWN_COMPLETE"
!
event manager applet POST_RELOAD_NO_SHUT_LO0 authorization bypass
 event syslog pattern "TRACK-6-STATE: 3 ip route 0.0.0.0/0 reachability Down -> Up"
 event timer countdown name DELAY_RLOC_BRINGUP time 60
 action 1.0 cli command "en"
 action 2.0 cli command "conf t"
 action 3.0 cli command "inter lo0"
 action 4.0 cli command "no shut"
 action 5.0 cli command "end"
 action 6.0 syslog priority critical msg "POST_RELOAD_LISP_RLOC_NO_SHUTDOWN_COMPLETE"
Here I track the route in GRT towards the WLC since we must have a specific (non-default) route towards the WLC anyways with SDA. But the first thing we do is to shutdown Loopback0 upon restart, meaning this is the frist thing we see in the log after a switch/router boots. Please note that for BGP to come up, we must use physical interfaces or some other loopback interface - not our Loopback0 ROC interface! After BGP converges (we receive the router via BGP to the WLC) we wait for a minute and then bring up Loopback0, because now we should be ready to forward traffic again.
Troubleshooting
Tips for troubleshooting DNAC.
Install Wizard
If the install wizard restarts at the “Start a Cisco DNA Center Cluster” after you’ve entered interface settings and the wizards verifies the settings, you might have entered static routes using CIDR notation instead of subnet mask. The static route list has to be space separated and in this format:
<network>/<netmask>/<gateway>
If you do <network>/<cidr>/<gateway> the wizard will take an aweful long time to verify the settings and eventually take you back to the Start a DNAC Cluster page.
ISE Integration
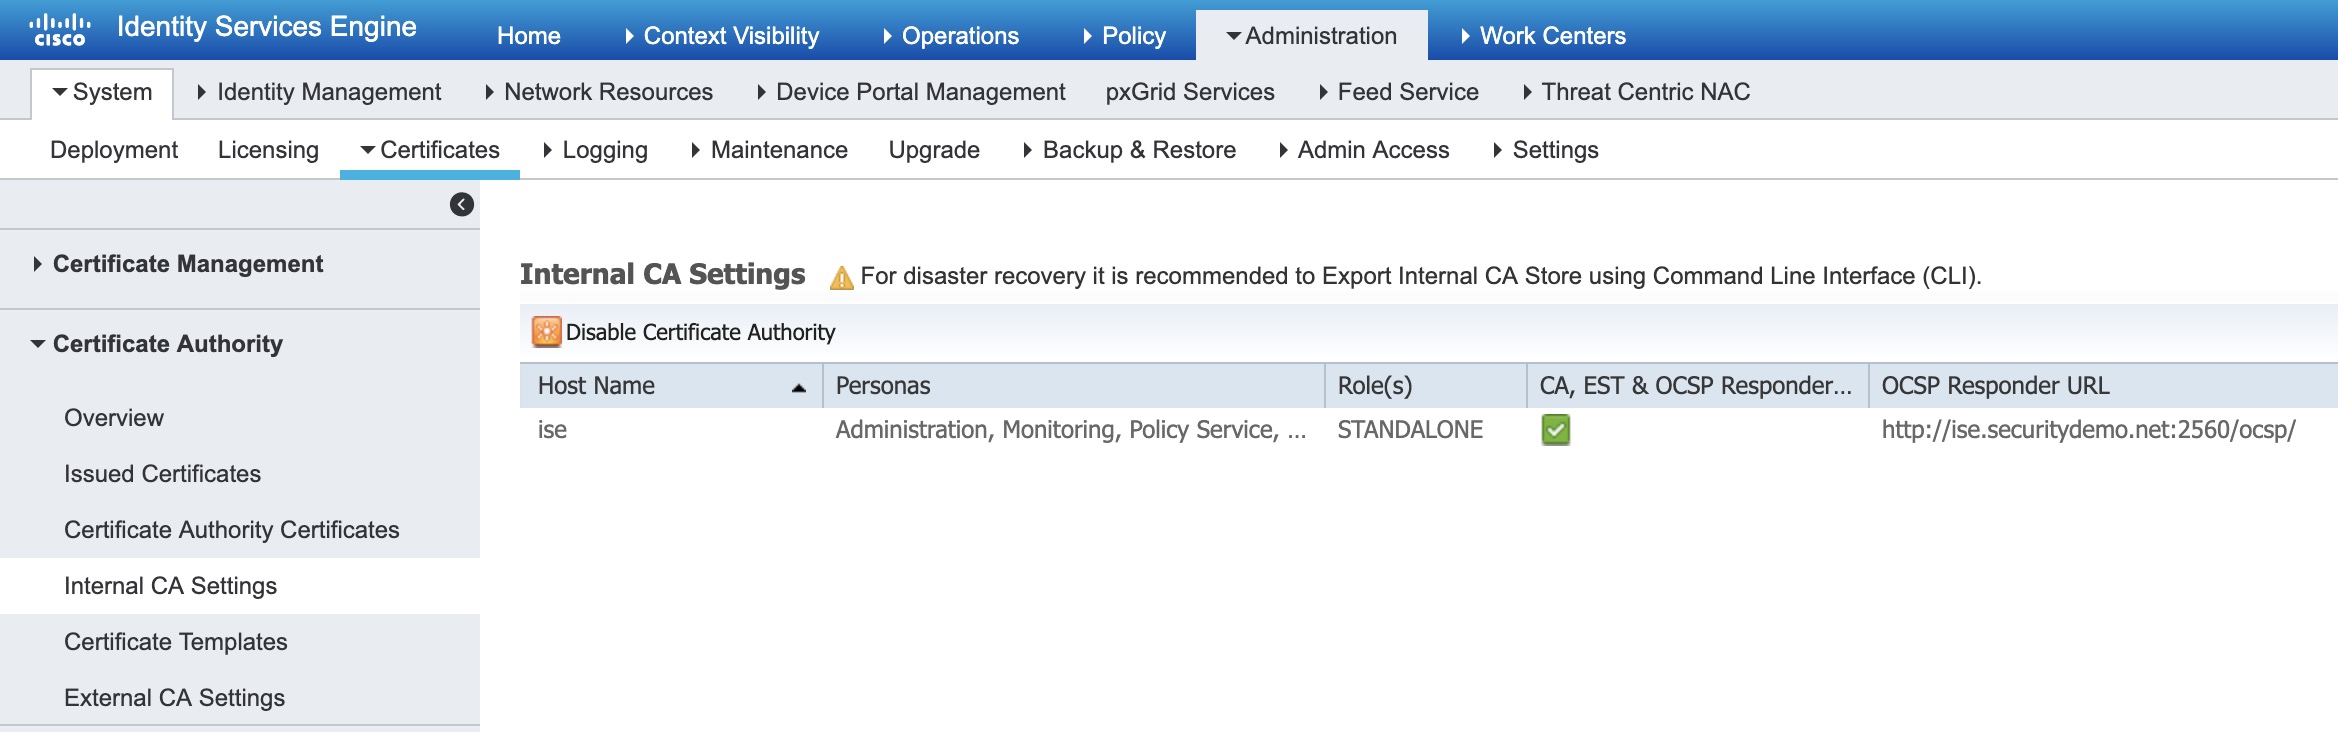
When doing an integration with ISE and you DO NOT see DNAC under pxGrid Services in ISE, the reason could be that the Internal CA of ISE is disabled. This has to be enabled to complete the integration.
Here is a picture of where you can enable the Internal CA:
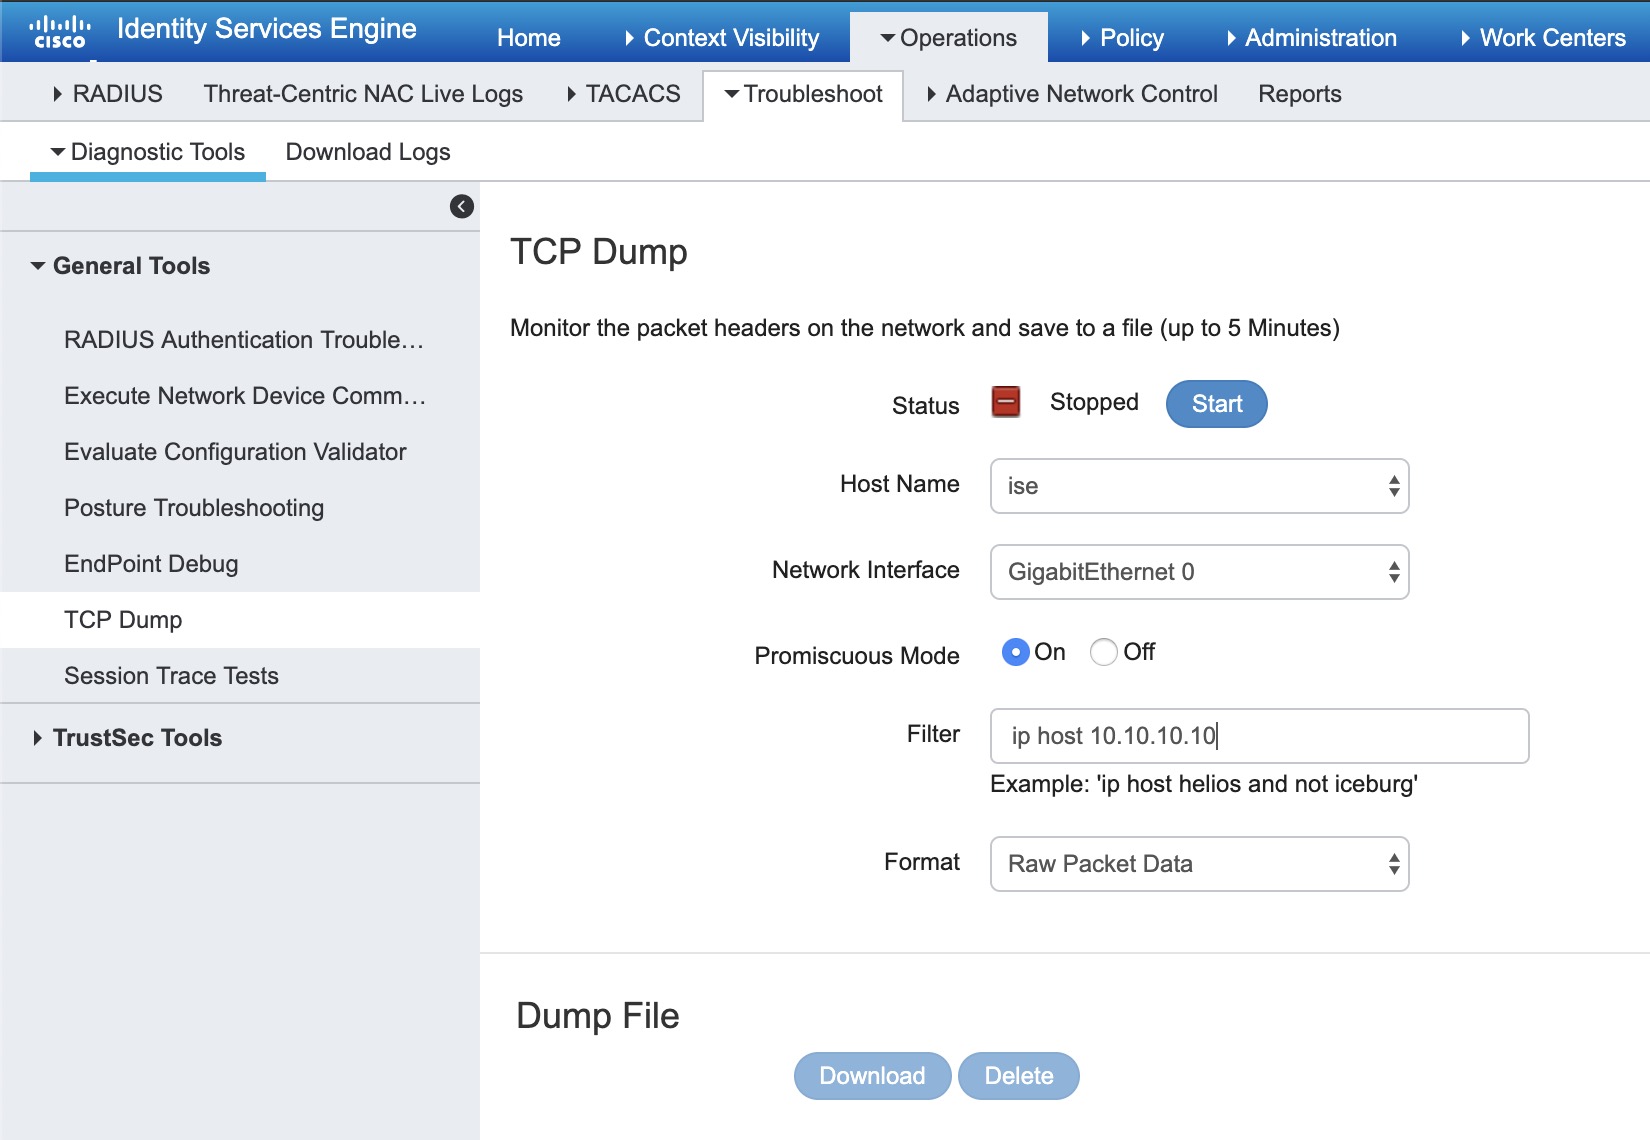
To assist in further troubleshooting of why this integration might fail, you can do a TCP Dump on ISE where you specify ip host x.x.x.x - the IP address of the DNAC interface - not the VIP.
Here is a picture of where you can create a TCP Dump in ISE:
Sometimes enabling the Internal CA isn’t enough. You’ll see this in a TCP Dump:
Alert (Level: Fatal, Description: Unknown CA)
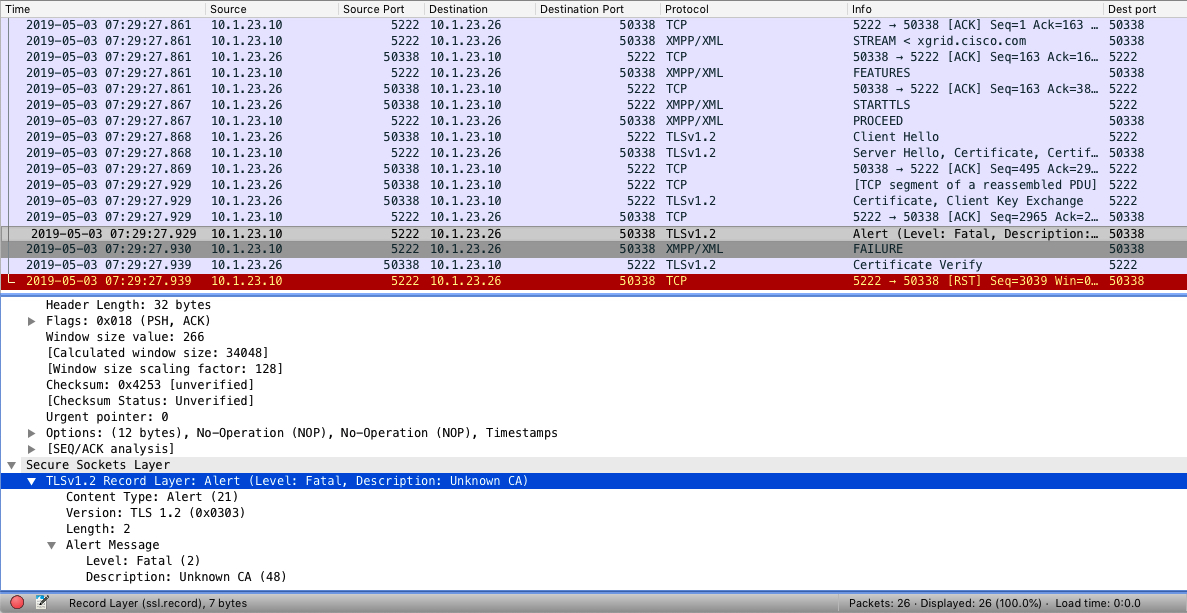
Here the IP addresses are defined as:
- ISE: 10.1.23.10
- DNAC: 10.1.23.26
This message is followed by a TCP reset (RST) from ISE and the integration will never complete. Possibly you’ll see this under Administration -> System -> Certificates -> Certificate Authority -> Issued Certificates:
Certificate trust chain is incomplete
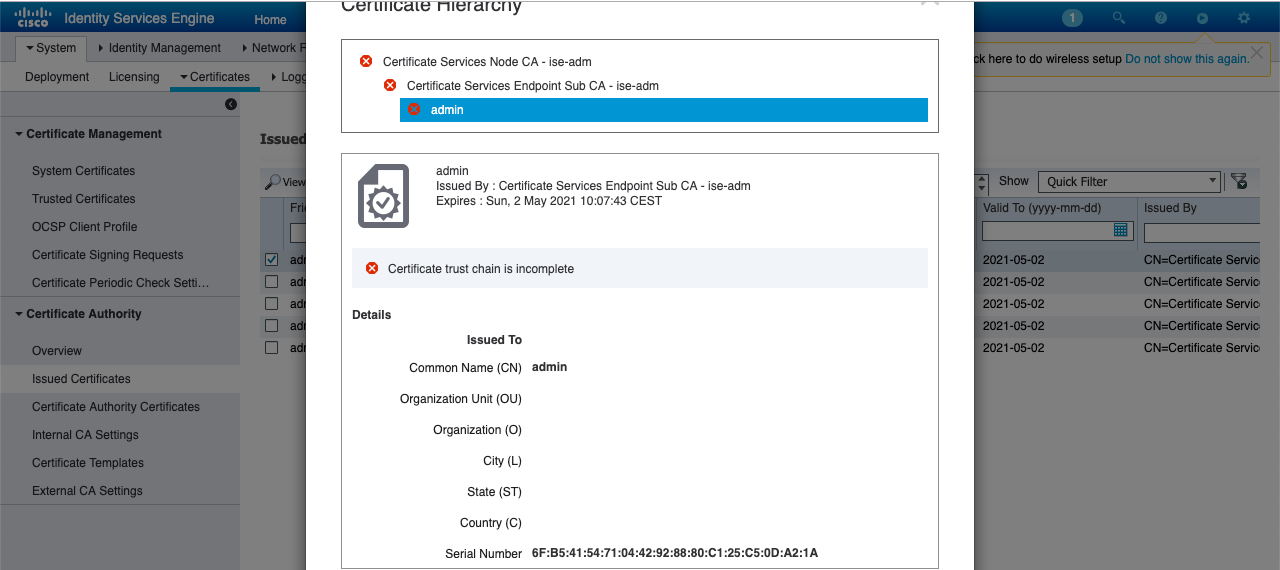
The Internal CA of ISE was originally intended for distributing certificates to endpoints. Primarily for customers who doesn’t have a PKI. If the Internal CA has already been configured, you could potentially break functionality of all endpoints by re-generating the CA certs as described below. Therefore proceed with caution and ensure the Internal CA isn’t used for other things. An alternative solution to restore the certificate chain could be to import the certificates. Below fix assumes that the Internal CA isn’t used for anything and we see this certificate chain issue.
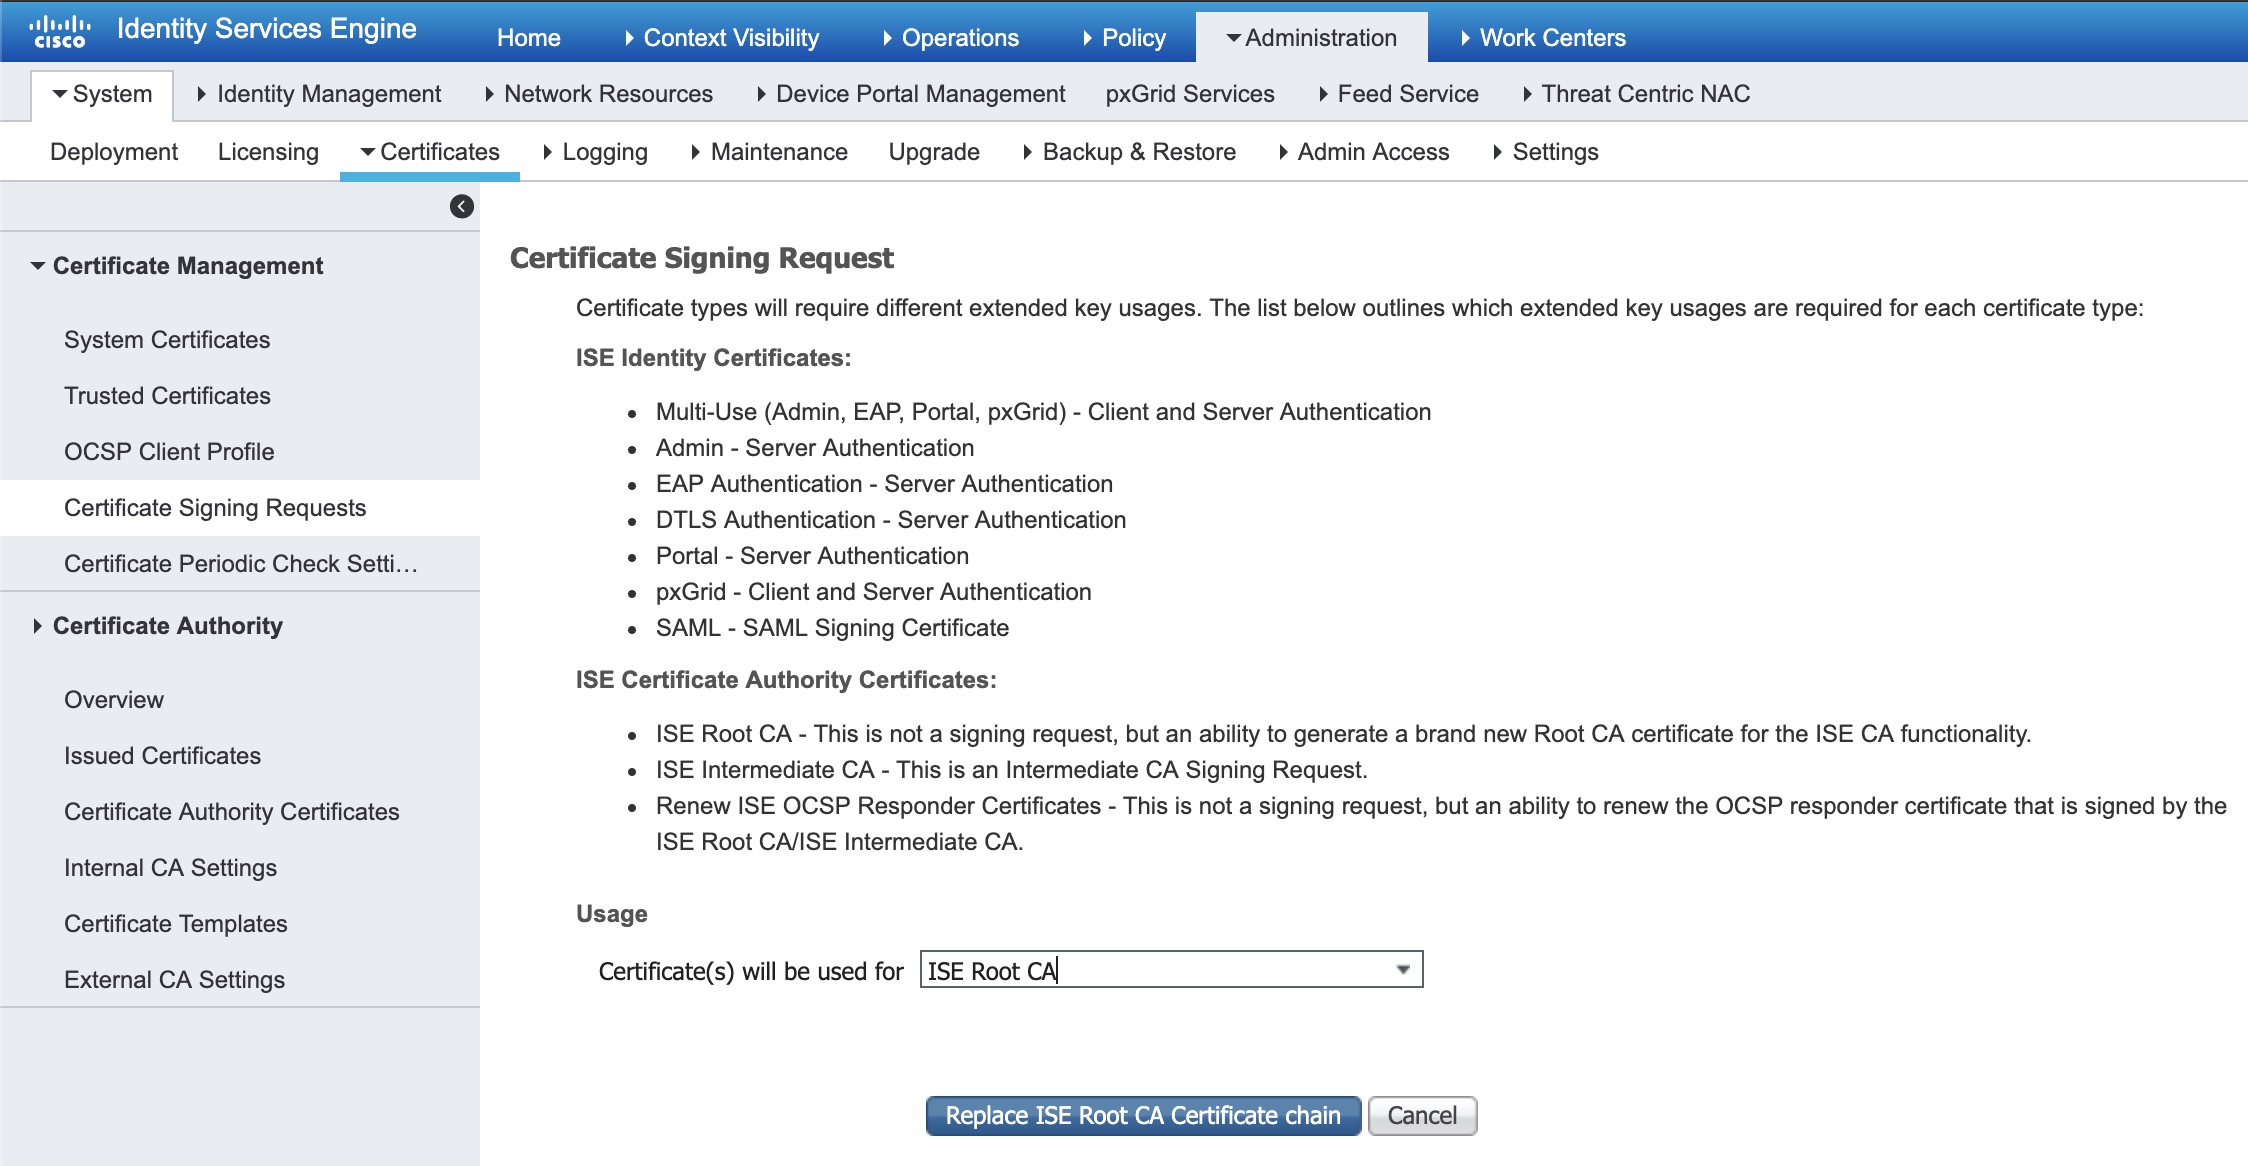
The fix is to generate new Root CA certificates. This is done under Administration -> System -> Certificates -> Manage Certificates -> Certificate Signing Requests -> Generate Certificate Signing Request (CSR). Select ISE Root CA under the Usage, like this:
Replace ISE Root CA Certificate chain. Now you should have a complete certificate chain:
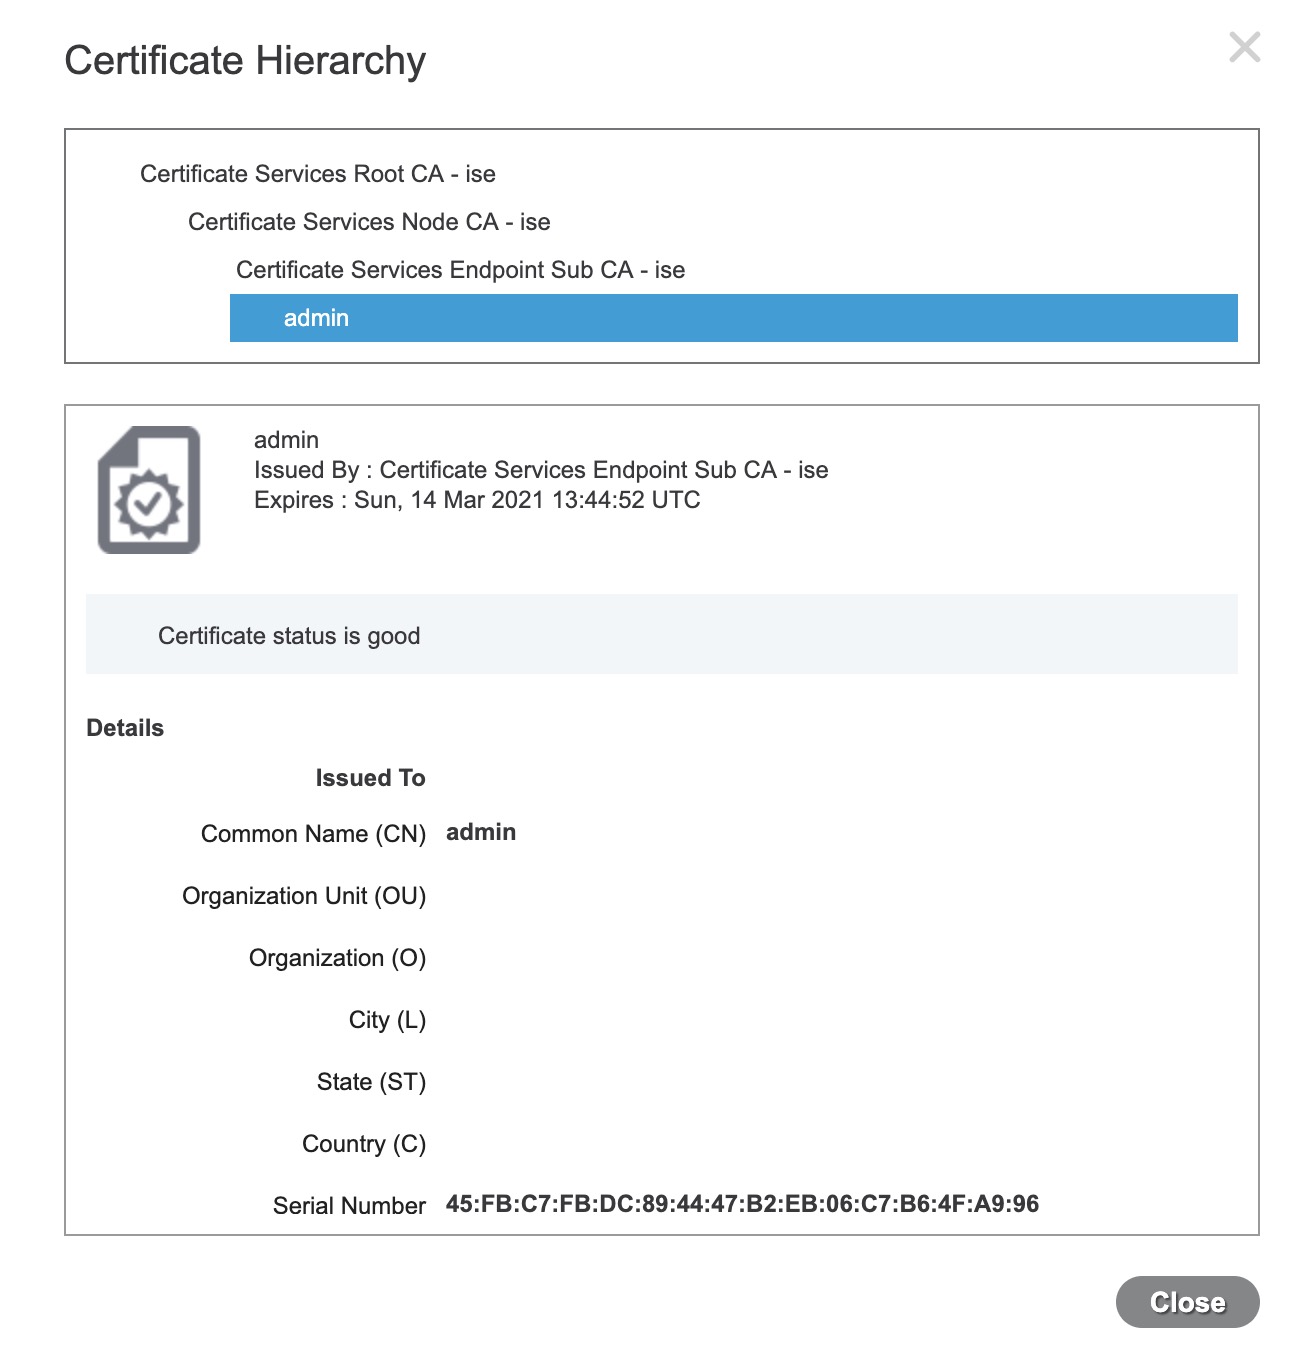
Retry the ISE integration, and you should be good to go!